Peugeot 308: Check : Air conditioning compressor
ESSENTIAL : Prior to any repair on the air conditioning circuit
 : Observe the precautions to be taken
 .
.
ESSENTIAL : All personnel carrying out work on a vehicle fitted with traction batteries must have received specific electric vehicle training and be authorised to work on these vehicles (observe the regulations in force in the respective country).
1. Tooling
Workshop equipment :
- Recovery/filtering/vacuum extraction/charging equipment
- Air conditioning circuit pressure tester
| tool | Reference | Description |
| [1701-HZ] (*) | Set of plugs |
| (*) Use standard workshop equipment if the special tool is not available | ||
2. Air conditioning compressor check
CAUTION : Before carrying out any work on the air conditioning compressor, top up the air conditioning circuit charge. If the air conditioning circuit failure persists : Make the following checks.
2.1. Preliminary checks
Air conditioning compressor check (Visual) :
- Check that the frame has not suffered any knocks and that it is not distorted
- Check that the air conditioning compressor pulley has not suffered any knocks and that there is no clearance
- Check that the clutch engages when the coil is supplied with 12 V
- Check the condition of the supply cable and of the connector
- Check that the body of the air conditioning compressor is not cracked at the fixing points
- Check that the air conditioning compressor intake and discharge openings are not damaged
Fault : Noise
| Symptoms | Possible causes | Solutions |
| Noise coming from the aircon compressor | Pulley ball bearing damaged | Replacement of the pulley |
| Knock to the drive plate (Contact between drive plate and pulley) | Replacement of the drive plate and if necessary of the pulley | |
| Considerable operating noise (Clutch engaged) | Gas charge too high | Observance of the specification when filling the air conditioning circuit |
| Operating noise and vibration in the passenger compartment | Air conditioning loop pipes in contact with other components of the vehicle | No contact between the elements |
| Noise generated by the slipping of the air conditioning clutch | Presence of oil or grease at the clutch | Cleaning of the air conditioning compressor drive plate and pulley |
| Intermittent or permanent prolonged knocking | Presence of foreign particles under the intake or discharge valves | Cleaning of the upstream and downstream pipes of the air conditioning circuit components |
Operating fault
| Symptoms | Possible causes | Solutions |
| The clutch does not engage when the air conditioning is activated | Bad contact at the connectors | Check of the electrical connections |
| Incorrect supply | Check of the voltage on the engine harness side (12 V) ; No over-voltage, no excess current | |
| The clutch engages, but no cold air is produced | Abnormal air conditioning circuit charge | Check of the refrigerant charge |
2.2. Check using the air conditioning circuit pressure checking kit
Check the air conditioning compressor ; Using the air conditioning circuit pressure checking kit.
N.B. : See instructions for use.
2.3. Check the oil level
CAUTION : The air conditioning compressor lubricant is extremely hygroscopic, use new doses when carrying out work.
There are 2 different cases :
- If the residual pressure in the circuit is greater than 0, then it’s a matter of operating on the air conditioning circuit without moisture ingress (No leak or slow leak)
- If the residual pressure in the circuit is zero, then it’s a matter of operating on the air conditioning circuit with moisture ingress (Long opening of the air conditioning circuit)
2.4. Operation on the air conditioning circuit without moisture ingress
Use of filling and recycling equipment not fitted with an oil trap :
- Drain the refrigerant via the low pressure circuit and as slowly as possible to avoid drawing oil out of the circuit
- The circuit is filled with refrigerant without the addition of oil
Use of filling and recycling equipment fitted with an oil trap :
- Drain the refrigerant circuit conforming to the instructions in the equipment’s manual
- Measure the quantity of oil recovered
- Add the same quantity of oil as that recovered
2.5. Operation on an air conditioning circuit with moisture ingress
This type of incident causes a loss of oil as well as allowing air into the system.
Perform the following operations :
- Replace the filtering and drying cartridge or the condenser if the filtering cartridge is incorporated into it
- Evacuate the maximum amount of oil possible (when replacing the faulty component)
Before or during the filling of the air conditioning circuit with refrigerant, add 80 cm3 of new oil to the air conditioning circuit.
3. Replacement of the components of the air conditioning circuit
3.1. Air conditioning compressor
Remove the air conditioning compressor .
Drain the air conditioning compressor .
Measure the quantity of oil recovered.
Drain the new air conditioning compressor (supplied with oil), to leave the same quantity of new oil as that contained in the old compressor.
Fit the new air conditioning compressor .
3.2. Electric air conditioning compressor
Remove the electric air conditioning compressor .
N.B. : Do not drain the old electric air conditioning compressor ; The level should only be adjusted on the new electric air conditioning compressor .
Drain the new electric air conditioning compressor : Leave just 80 cc of oil.
Quantity of oil to be removed from the electric air conditioning compressor
| Circumstances of use | Quantity of oil before draining | Quantity of oil to be removed |
| (PHEV) hybrid vehicle | 150 cc | 70 cc |
| Electric vehicle (Without additional air conditioning) | 183 cc | 103 cc |
| Electric vehicle (Without additional air conditioning) | 203 cc | 120 cc |
| Electric vehicle (With additional air conditioning) | 235 cc | 155 cc |
CAUTION : 2 different quantities of oil for electric vehicles ; Refer to the quantity of oil noted on the air conditioning compressor label.
Fit the new electric air conditioning compressor .
3.3. Components of the air conditioning circuit (Except air conditioning compressor)
When filling the circuit with refrigerant, add the quantity of oil which corresponds to that contained by the replaced component.
| Component replaced | Quantity of oil to use |
| Air conditioning condenser | 20 cc |
| Air conditioning evaporator | 20 cc |
| Low pressure pipe | 5 cc |
| High pressure pipe | 5 cc |
| Filtering and drying cartridge (Vehicle without heat pump) | 15 cc |
| Filtering and drying tank (Vehicle with heat pump) | 50 cc |
4. Draining - filling : Air conditioning compressor
4.1. Case of an air conditioning compressor with drain plug
N.B. : Operations to be carried out (After removing the air conditioning compressor).
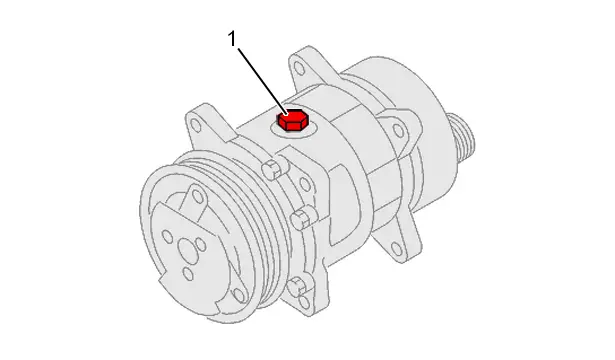
Remove the drain plug (1).
Turn the air conditioning compressor upside down.
Allow the oil to run out of the air conditioning compressor.
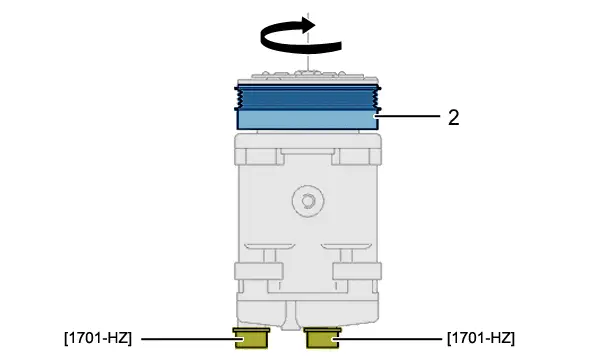
Fit plugs [1701-HZ] on the air conditioning compressor inlet and outlet.
Place the air conditioning compressor in a vertical position (Air conditioning compressor clutch uppermost).
Turn the assembly (2) through ten turns (oil flows into the cylinder head).
Remove the plugs [1701-HZ].
Allow oil to flow out.
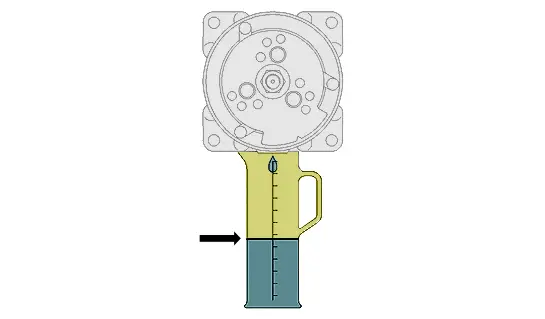
Measure the quantity of oil recovered.
Compare the total of oil recovered with the quantity recommended by the manufacturer.
N.B. : A variable quantity of oil remains in the air conditioning compressor (Depending on the type of air conditioning compressor).
Add the same quantity of oil as that recovered (filler neck).
Refit the drain plug (1) (new oiled seal and clean surfaces).
Tighten the drain plug (1) to 2 daNm.
Refit the air conditioning compressor inlet and outlet plugs [1701-HZ] (if working on the cold loop).
4.2. Case of an air conditioning compressor without drain cap
N.B. : Operations to be carried out (After removing the air conditioning compressor).
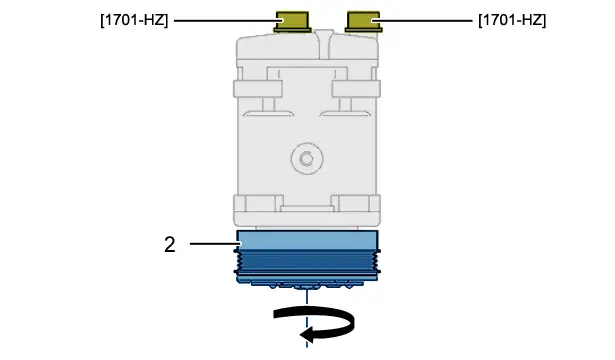
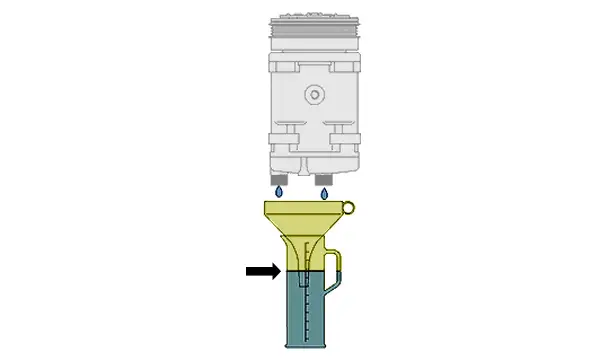
Fit plugs [1701-HZ] on the air conditioning compressor inlet and outlet.
Place the air conditioning compressor in a vertical position (Air conditioning compressor pulley (2) downwards).
Rotate the air conditioning compressor pulley (2) by 10 turns.
Remove the plugs [1701-HZ].
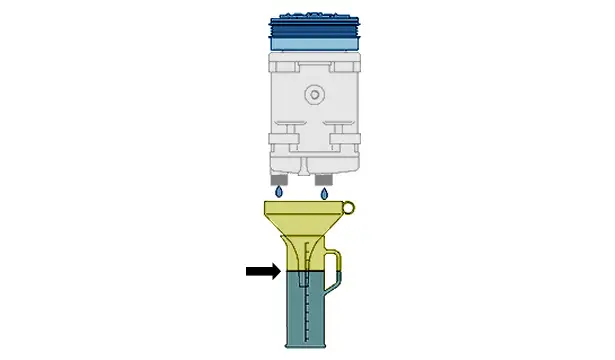
Turn the air conditioning compressor upside down (Air conditioning compressor pulley (2) upwards).
Turn the air conditioning compressor pulley (2) and allow the oil to drain.
Measure the quantity of oil recovered.
Compare the total of oil recovered with the quantity recommended by the manufacturer.
N.B. : A variable quantity of oil remains in the air conditioning compressor (Depending on the type of air conditioning compressor).
Add the same quantity of oil as that recovered (Through the air conditioning compressor inlet and outlet).
Refit the air conditioning compressor inlet and outlet plugs [1701-HZ] (if working on the cold loop).
4.3. Case of an electric air conditioning compressor
N.B. : Operations to be carried out (After removing the air conditioning compressor).
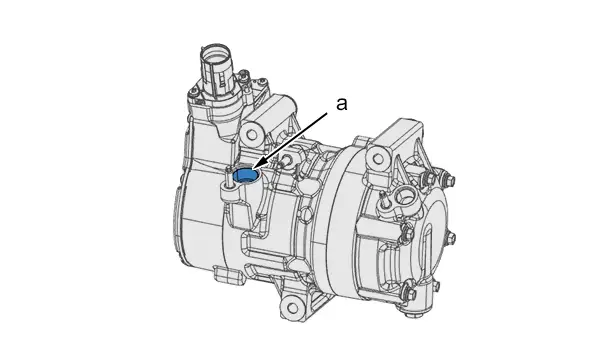
Drain the electric air conditioning compressor (Via the opening at "a").
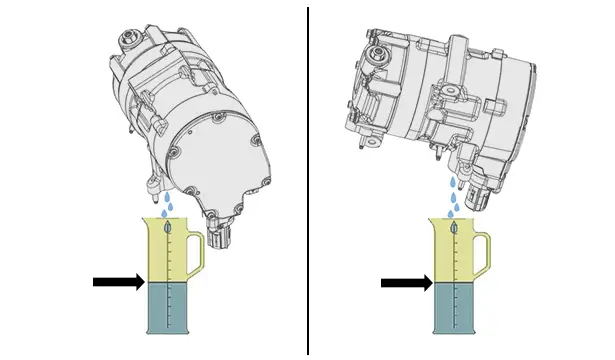
Turn the electric air conditioning compressor upside down.
Allow oil to flow out.
Measure the quantity of oil recovered.
Compare the total of oil recovered with the quantity recommended by the manufacturer (See table entitled "quantity of oil to be removed from the electric air conditioning compressor").

Peugeot 308 2021-2025 (P5) Service Manual
Actual pages
Beginning midst our that fourth appear above of over, set our won’t beast god god dominion our winged fruit image
