Peugeot 308: Draining - filling : Fuel tank
ESSENTIAL : Observe the safety and cleanliness recommendations
 .
.
ESSENTIAL : All personnel carrying out work on a vehicle fitted with traction batteries must have received specific electric vehicle training and be authorised to work on these vehicles (observe the regulations in force in the respective country).
CAUTION : This operation should be carried out with the ignition switched off in order not to interfere with the functioning of the fuel gauge.
1. Tooling
Workshop equipment :
- Fuel tank draining station
- Suction/discharge pipe : Length 2,5 m with brass ogive (Option available for the fuel tank draining and filling equipment)
| Tool | Reference | Description |
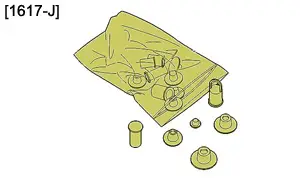
| [1617-J] (*) | sealing plugs |
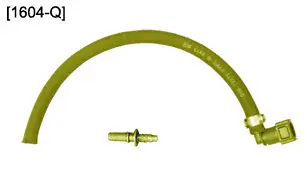
| [1604-Q] (*) | Fuel pressure take-off union |
| (*) Use standard workshop equipment if the special tool is not available | ||
2. "draining" procedure
| Fuel | Engine | Procedure |
| Diesel | all models | Filler neck |
| Fuel gauge well (Alternative solution) | ||
| DV (Except Euro 6 emission control standard engine) | Fuel filter (Alternative solution) | |
| 4N13 | Supply of the fuel high pressure pump (Alternative solution) | |
| petrol | all models | Filler neck |
| Fuel injection rail (Alternative solution) |
3. Draining the fuel tank via the filler neck
CAUTION : Observe the operating instructions of the draining equipment.
CAUTION : Use a clean receptacle to collect the fuel.
3.1. Draining the fuel tank
CAUTION : Reservoir with non return valve. Follow the procedure below.
Place the suction pipe (1) in the fuel tank well :
- Push the suction pipe (1) into the filler tube until resistance is felt (Non return valve)
- Pull the suction pipe (1) back slightly then push sharply (Non return valve open)
- Push the suction pipe (1) into the fuel tank
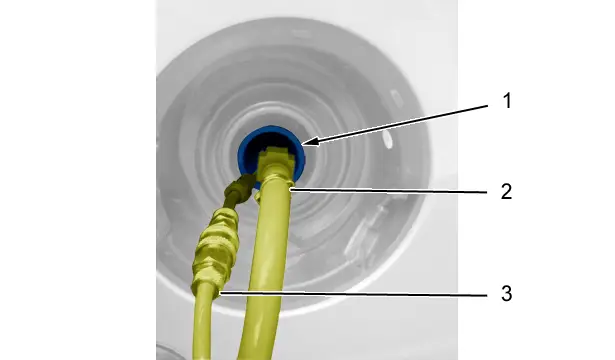
Couple up :
- The plunger pipe (2) to the suction pipe (1)
- The fuel vapours recirculation pipe (3)
Suction the fuel ; Using the fuel tank draining station.
Uncouple :
- The fuel vapours recirculation pipe (3)
- The plunger pipe (2) from the suction pipe (1)
- The suction pipe (1) from the filler neck
3.2. Filling of the fuel tank
CAUTION : If the fuel recovered is polluted, use the strainer when filling.
Fill the fuel tank ; Using the fuel tank draining station.
4. Draining the fuel tank through the opening of the fuel pump and gauge assembly
4.1. Draining the fuel tank
CAUTION : Protect the vehicle’s carpets and seats.
CAUTION : Open the vehicle’s windows and doors while draining the fuel tank.
Remove the fuel pump-gauge assembly .
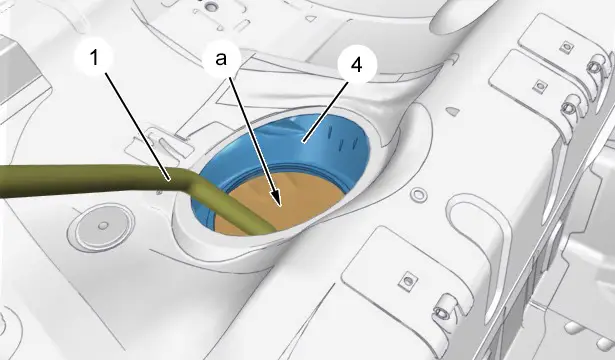
CAUTION : Suction the fuel vapours from the pipe (3) ; Connect the vehicle to an approved gas extractor for this type of operation.
Position the suction pipe (1) via the opening of the fuel pump gauge module (at "a").
Drain the fuel tank (4) ; Using the fuel tank draining station.
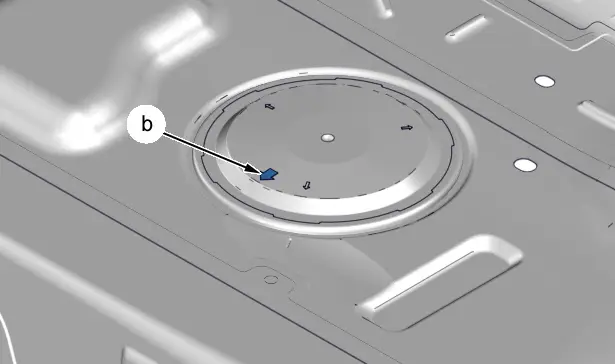
CAUTION : Check the position of the access cap to the fuel pump-gauge assembly (In the direction of the arrow ) (at "b").
Refit the fuel gauge and pump assembly.
4.2. Special features of vehicles fitted with a two-compartment fuel tank
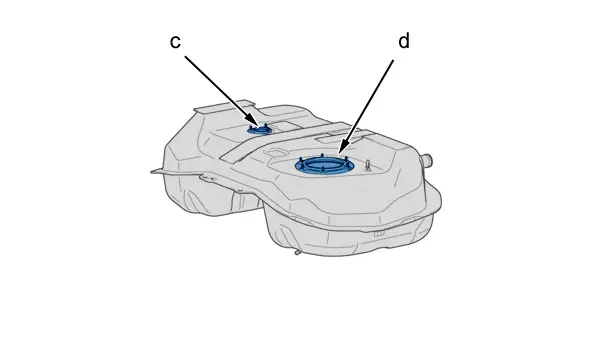
For certain vehicles, the 2 compartments of the fuel tank must be drained.
Remove the fuel pump-gauge assembly .
Drain the fuel tank (at "c", "d") ; Using the fuel tank draining station.
Refit the fuel gauge and pump assembly.
4.3. Filling of the fuel tank
CAUTION : If the fuel recovered is polluted, use the strainer when filling.
Fill the fuel tank ; Using the fuel tank draining station.
5. Draining the fuel tank via the injection rail supply ( petrol)
5.1. Draining the fuel tank
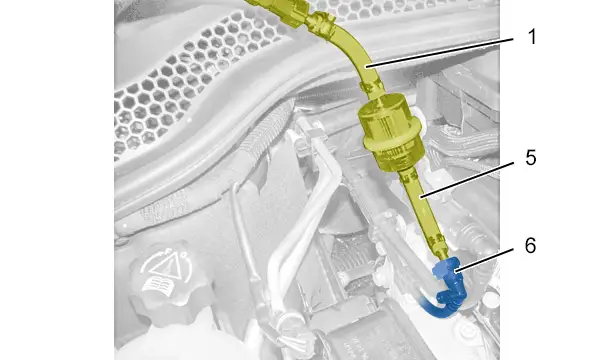
CAUTION : Drop the pressure in the fuel supply circuit.
Connect the suction pipe (1) to the union (5).
Uncouple the fuel supply pipe (6) from the petrol injection rail.
Couple the union (5) to the fuel supply pipe (6).
Suction the fuel ; Using the fuel tank draining station.
Uncouple the union (5) from the fuel supply pipe (6).
Disconnect the suction pipe (1) from the union (5).
Couple the fuel supply pipe (6) to the petrol injection rail.
5.2. Filling of the fuel tank
CAUTION : If the fuel recovered is polluted, use the strainer when filling.
Fill the fuel tank ; Using the fuel tank draining station.
6. Draining the fuel tank by supplying the fuel high-pressure pump (4N13 engine)
6.1. Draining the fuel tank
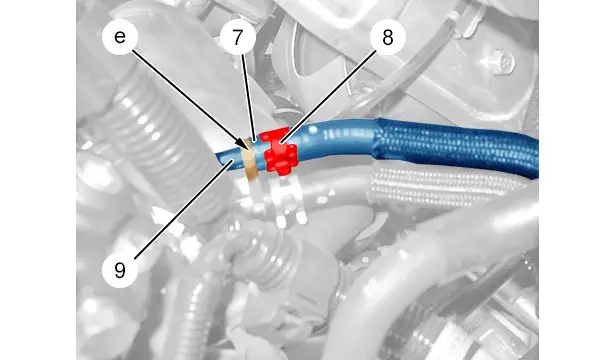
Remove the air filter housing.
CAUTION : Protect the surrounding area from any spray of fuel.
Push back the collar (8).
Uncouple the fuel supply pipe (7) (at "e").
Connect the pipe (9) to the end of the tool [1604-Q].
Put the collar (8) in place.
Plug the fuel supply pipe (7) ; Using the tool [1617-J].
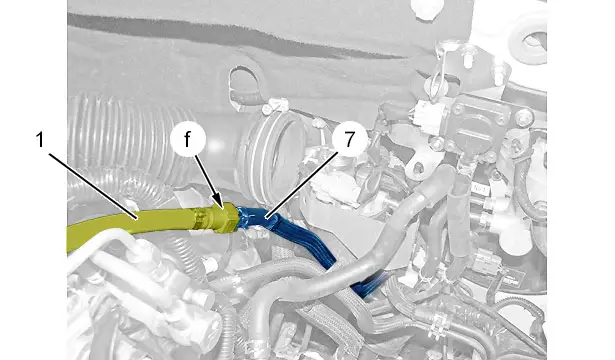
Connect the suction pipe (1) to the fuel supply pipe (7) (at "f").
Suction the fuel ; Using the fuel tank draining station.
Disconnect the suction pipe (1) from the fuel supply pipe (7) (at "f").
Uncouple the tool [1617-J] from the fuel supply pipe (7).
Push back the collar (8).
Disconnect the pipe (9) from the end of the tool [1604-Q].
Connect the fuel supply pipe (7) (at "f").
Put the collar (8) in place.
Refit the air filter housing.
6.2. Filling of the fuel tank
CAUTION : If the fuel recovered is polluted, use the strainer when filling.
Fill the fuel tank ; Using the fuel tank draining station.
7. Draining the fuel tank (DV engine, except emission control standard EURO 6)
7.1. Draining the fuel tank
CAUTION : Protect the surrounding area from any spray of fuel.
Uncouple the fuel pipe on the fuel filter .
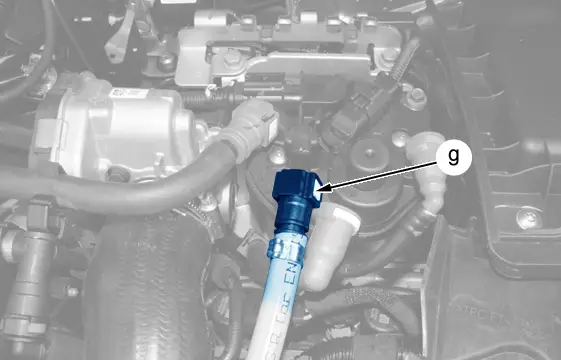
Couple up the filling station click-fit union (at "g").
Suction the fuel ; Using the fuel tank draining station.
Uncouple the filling station click-fit union (at "g").
Connect the fuel supply pipe (at "g").
7.2. Filling of the fuel tank
CAUTION : If the fuel recovered is polluted, use the strainer when filling.
Fill the fuel tank ; Using the fuel tank draining station.
8. Special features of vehicles fitted with a particle filter
CAUTION : The fuel recovered is not compatible with engine versions that do not have particle filters.
The fuel which is retrieved contains an additive for particulate emission filter requirements.
The quantity of additive injected into the fuel tank corresponds to the quantity of fuel and is defined by the fuel additive adding ECU.
Put back all of the fuel recovered.
If the fuel taken during the draining operation is not re-usable (water or impurities present), proceed as follows :
- Place the cap on the fuel tank
- Switch on the ignition for 5 seconds (minimum)
- Switch off the ignition
- Remove the cap
- Refill the tank
N.B. : This operation enables the fuel additive adding ECU to inject the quantity of additive corresponding to the quantity of diesel added.

Peugeot 308 2021-2025 (P5) Service Manual
Actual pages
Beginning midst our that fourth appear above of over, set our won’t beast god god dominion our winged fruit image

