Peugeot 308: Replacement : Headlamp fixing plates - Daytime running lamp
ESSENTIAL : Observe the safety and cleanliness recommendations
 .
.
ESSENTIAL : All personnel carrying out work on a vehicle fitted with traction batteries must have received specific electric vehicle training and be authorised to work on these vehicles (observe the regulations in force in the respective country).
1. Headlamp fixing plates
1.1. Preliminary operations
ESSENTIAL : Check that the headlamp is not damaged beyond the limits of the cuts permitted ; Otherwise, replace the headlamp .
CAUTION : Perform the operations that are required prior to a disconnection of the ancillaries battery
 .
.
CAUTION : In the case of a vehicle with 2 batteries, carry out the specific operations for disconnecting and reconnecting the ancillaries batteries.
Disconnect the ancillaries battery or batteries (depending on equipment).
Remove the headlamp
 .
.
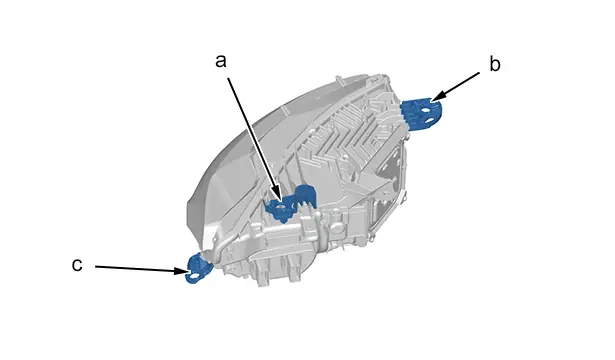
1.2. Identification
| Identification | Description | Reparability |
| "a" | Rear mounting bracket | Yes |
| "b" | Front mounting bracket | Yes |
| "c" | Lower FIXING CLIP | Yes |
1.3. Parts required
N.B. : 2 repair kits are provided (left-hand and right-hand sides).
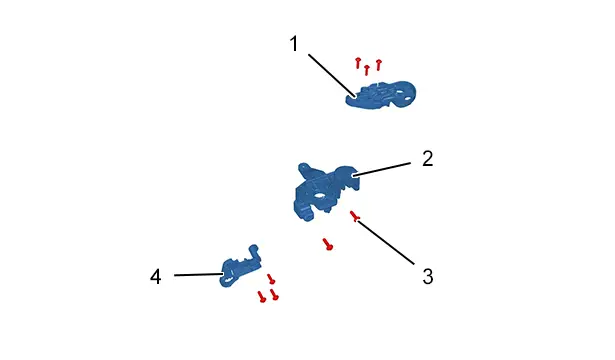
Composition of the kit
| Identification | Description | Number of parts |
| (1) | Front repair bracket | 1 |
| (2) | Rear repair bracket | 1 |
| (3) | Bolt | 8 |
| (4) | Lower repair bracket | 1 |
1.4. Replacement : Rear repair bracket
N.B. : The following operations are identical for the right and left headlamps.
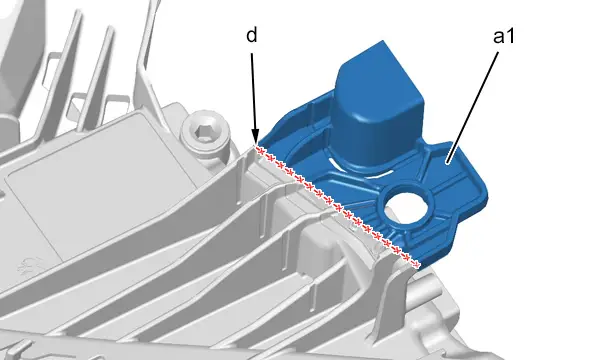
Cut out the zone " a1" (at "d") ; Using a hacksaw.
Adjust and deburr the cut if necessary for fitting of the repair bracket (2) on the headlamp mounting bracket (at "a").
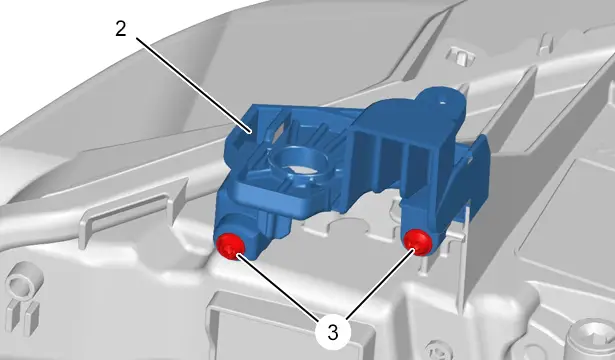
Fit :
- The rear repair bracket (2)
- The 2 bolts (3)
Progressively tighten the fixing screws (3) in turn to the limit.
Check that there is no clearance between the repair bracket (2) and the mounting bracket (at "a").
1.5. Replacement : Front mounting bracket
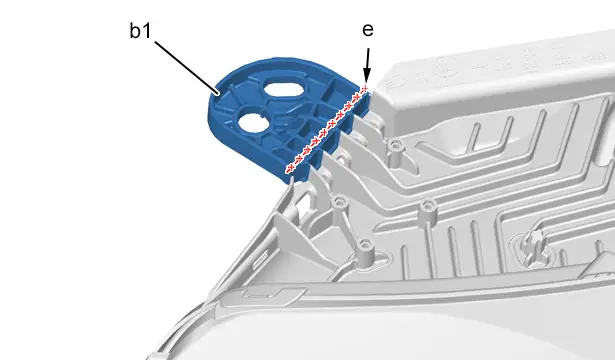
Cut out the zone " b1" (at "e") ; Using a hacksaw.
Adjust and deburr the cut if necessary for fitting of the repair bracket (1) on the headlamp mounting bracket (at "b").
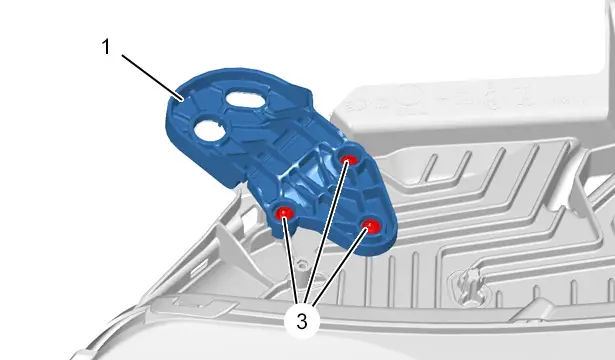
Fit :
- The front repair bracket (1)
- The 3 bolts (3)
Progressively tighten the fixing screws (3) in turn to the limit.
Check that there is no clearance between the repair bracket (1) and the mounting bracket (at "b").
1.6. Replacement - Lower FIXING CLIP
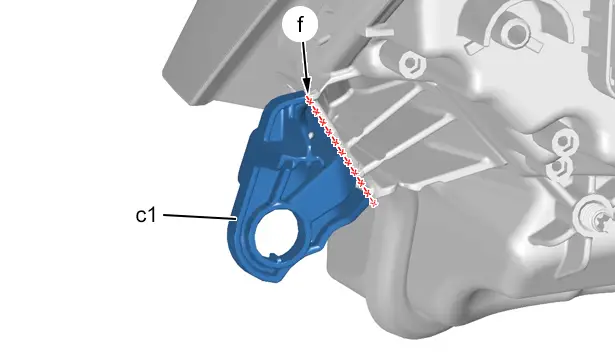
Cut out the zone " c1" (at "f") ; Using a hacksaw.
Adjust and deburr the cut if necessary for fitting of the repair bracket (4) on the headlamp mounting bracket (at "f").
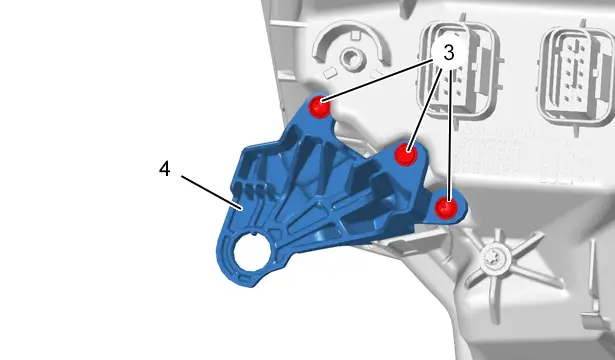
Fit :
- The lower repair bracket (4)
- The 2 bolts (3)
Progressively tighten the fixing screws (3) in turn to the limit.
Check that there is no clearance between the repair bracket (4) and the mounting bracket (at "c").
1.7. Additional operations
Refit the headlamp
 .
.
CAUTION : Perform the operations that are required after reconnecting the ancillaries battery
 .
.
CAUTION : In the case of a vehicle with 2 batteries, carry out the specific operations for disconnecting and reconnecting the ancillaries batteries.
Reconnect the ancillaries battery or batteries (depending on equipment).
1.8. Check
Check the operation of the various equipment.
1.9. Adjustment
Check and adjust the headlamps.
2. Daytime running lamp fixing clips
2.1. Preliminary operations
ESSENTIAL : Check that the day running lamp is not damaged beyond the limits of the cuts permitted ; If this is not the case, replace the day running lamp.
CAUTION : Perform the operations that are required prior to a disconnection of the ancillaries battery
 .
.
CAUTION : In the case of a vehicle with 2 batteries, carry out the specific operations for disconnecting and reconnecting the ancillaries batteries.
Disconnect the ancillaries battery or batteries (depending on equipment).
Remove the daytime running lamp
 .
.
2.2. Identification

| Identification | Description | Reparability |
| "g" | Upper attaching lug | Yes |
| "h" | Lower FIXING CLIP | Yes |
2.3. Parts required
N.B. : 2 repair kits are provided (left-hand and right-hand sides).
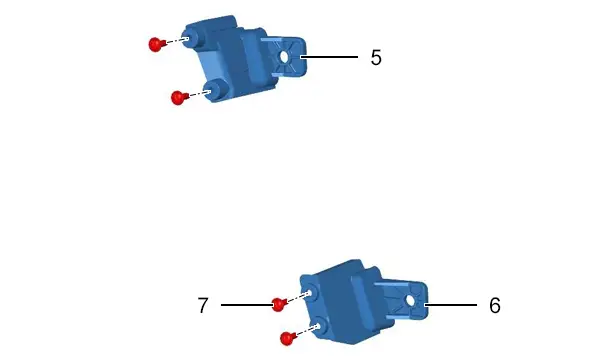
Composition of the kit
| Identification | Description | Number of parts |
| (5) | Upper repair bracket | 1 |
| (6) | Lower repair bracket | 1 |
| (7) | Bolt | 4 |
2.4. Replacement : Upper repair bracket
N.B. : The following operations are identical for the right-hand and left-hand day running lamps.
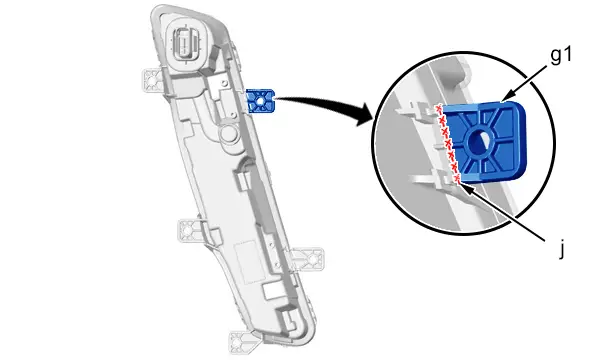
Cut out the zone " g1" (at "j") ; Using a hacksaw.
Adjust and deburr the cut if necessary to fit the repair clip (5) on the day running lamp fixing clip (at "j").
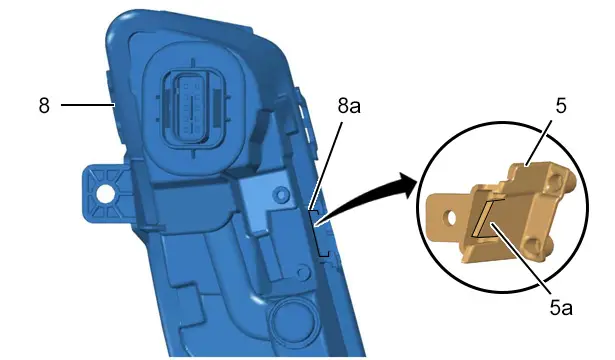
N.B. : Check the flush fitting of the repair clip (5) on the day running lamp (8).
Position and adjust the rib (5a) on the upper repair clip (5) in the notch (8a) of the day running lamp (8).
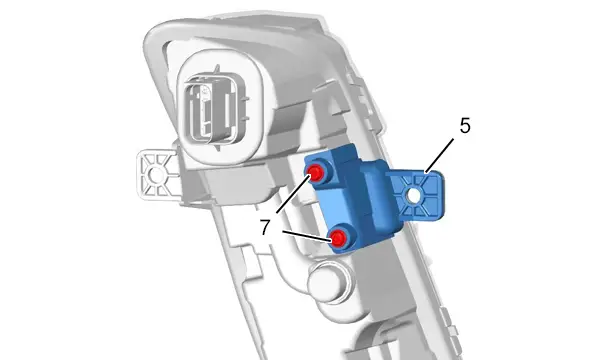
Fit the bolts (7).
Progressively tighten the fixing screws (7) in turn to the limit.
Check that there is no clearance between the repair bracket (5) and the mounting bracket (at "g").
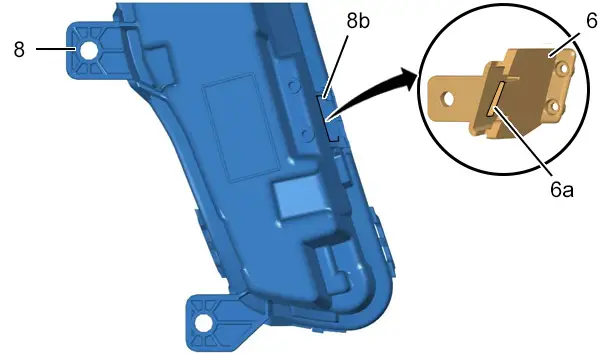
2.5. Replacement : Lower FIXING CLIP
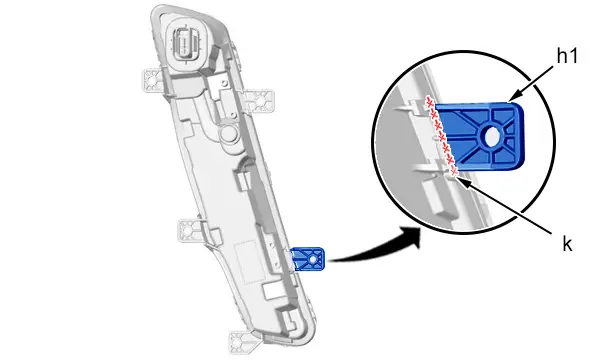
Cut out the zone " h1" (at "k") ; Using a hacksaw.
Adjust and deburr the cut if necessary to fit the repair clip (6) on the day running lamp fixing clip (at "k").
N.B. : Check the flush fitting of the repair clip (5) on the day running lamp (8).
Position and adjust the rib (6a) of the lower repair clip (6) in the notch (8b) of the day running lamp (8).
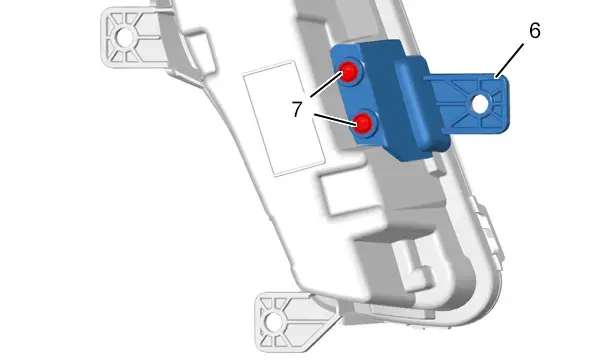
Fit the bolts (7).
Progressively tighten the fixing screws (7) in turn to the limit.
Check that there is no clearance between the repair bracket (6) and the mounting bracket (at "h").
2.6. Additional operations
Refit the day running lamp
 .
.
CAUTION : Perform the operations that are required after reconnecting the ancillaries battery
 .
.
CAUTION : In the case of a vehicle with 2 batteries, carry out the specific operations for disconnecting and reconnecting the ancillaries batteries.
Reconnect the ancillaries battery or batteries (depending on equipment).
2.7. Check
Check the operation of the various equipment.

Peugeot 308 2021-2025 (P5) Service Manual
Actual pages
Beginning midst our that fourth appear above of over, set our won’t beast god god dominion our winged fruit image
