Peugeot 308: Removing - refitting : Front door
ESSENTIAL : Observe the safety and cleanliness recommendations
 .
.
ESSENTIAL : All personnel carrying out work on a vehicle fitted with traction batteries must have received specific electric vehicle training and be authorised to work on these vehicles (observe the regulations in force in the respective country).
CAUTION : Always replace the shaft and the retaining clip whenever the door hinges are replaced.
1. Tooling
Workshop equipment : Door support .
| Tool | Reference | Description |
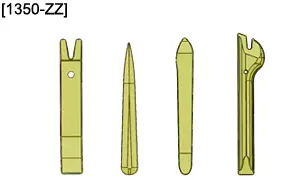
| [1350-ZZ] | Stripping tools |
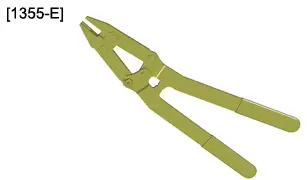
| [1355-E] | Pin extractor |
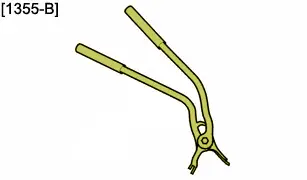
| [1355-B] | Pin extractor |
2. Preliminary operations
CAUTION : Perform the operations that are required prior to a disconnection of the ancillaries battery
 .
.
CAUTION : In the case of a vehicle with 2 batteries, carry out the specific operations for disconnecting and reconnecting the ancillaries batteries.
Disconnect the ancillaries battery or batteries (depending on equipment).
3. Removing
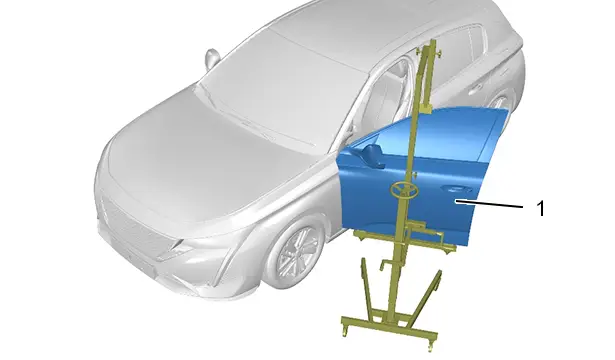
Place the front door (1) on the door support.
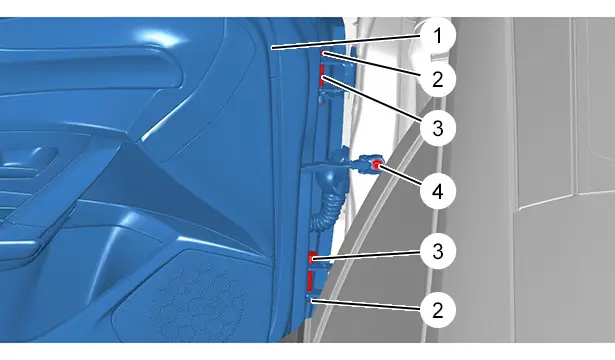
Remove :
- The front door check strap bolt (4)
- The circlips (2)
- The shafts (3) ; Using tools [1355-E] and [1355-B]
Disengage the front door (1) (Take care not to come into contact with the front wing).
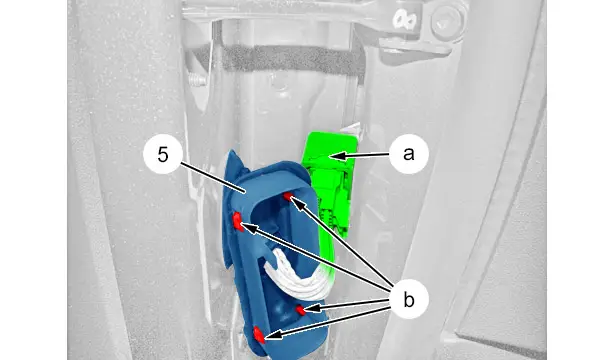
CAUTION : Detach the sleeve with care.
Unclip the sleeve (5) (at "b") ; Using the tools [1350-ZZ].
Unlock the connector (at "a").
Remove the front door (1).
4. Adjustment
4.1. Door hinges (Door side)
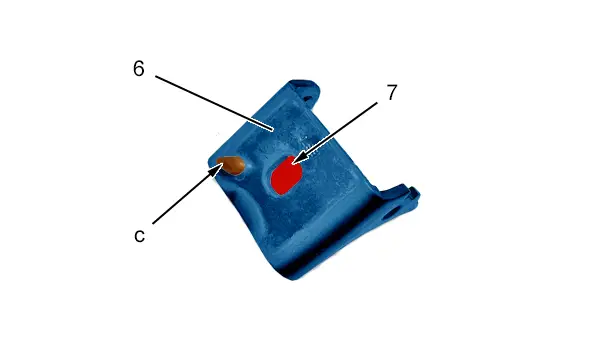
N.B. : The door hinges (6) are indexed on the door side. However, it is possible to remove the indexing "c" if additional adjustment is necessary.
Remove :
- The bolt (7)
- The door hinges (6)
Cut the indexing pins (at "c") ; Using a hacksaw.
CAUTION : Apply corrosion treatments in the indexing zone .
Refit the hinges (6) (without tightening).
4.2. Door hinges (Body side)
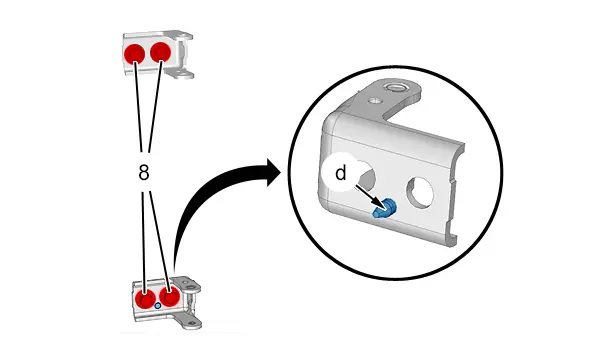
N.B. : The door hinges are indexed on the bodywork side. However, it is possible to remove the indexing "d" if additional adjustment is necessary ; Using a pin punch.
Remove the hinges .
Remove the indexes (at "d").
CAUTION : Apply corrosion treatments in the indexing zone .
Refit the hinges (without tightening).
The adjustment of the front door clearances is carried out on the fixed hinges retained by the bolts (8).
4.3. Door striker
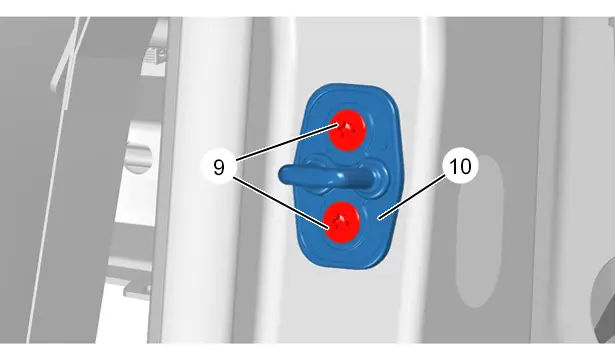
Slacken the bolts (9) by a quarter turn to permit closing of the door without stress due to the striker (10).
4.4. Adjustment
Refit :
- The front door (1) ; Using the door support
- The shafts (3)
- The circlips (2)
- The front door check strap bolt (4)
Reconnect the connector (at "a").
Close the door.
Check the fits and clearances ; Using screws (7), (8) and (9).
Do up the screws (7), (8) and (9) as far as possible, without tightening them.
Disconnect the connector (at "a").
Remove :
- The front door check strap bolt (4)
- The circlips (2)
- The shafts (3) ; Using the tools [1355-E]
Refit the front door (1) (Take care not to come into contact with the front wing).
Tighten :
- The bolts (7)
- The bolts (8)
- The bolts (9)
5. Refitting
CAUTION : Apply the correct tightening torques
 .
.
Position the front door (1) ; Using the door support.
Reconnect and lock the connector (at "a").
Refit :
- The sleeve (5)
- The front door (1) ; Using the door support
- The shafts (3)
- The circlips (2)
- The front door check strap bolt (4)
6. Additional operations
CAUTION : Perform the operations that are required after reconnecting the ancillaries battery
 .
.
CAUTION : In the case of a vehicle with 2 batteries, carry out the specific operations for disconnecting and reconnecting the ancillaries batteries.
Reconnect the ancillaries battery or batteries (depending on equipment).
7. Check
Check the operation of the various equipment.

Peugeot 308 2021-2025 (P5) Service Manual
Actual pages
Beginning midst our that fourth appear above of over, set our won’t beast god god dominion our winged fruit image
