Peugeot 308: Temporary puncture repair kit
Visit this link to view explanatory videos: http://q-r.to/bagGl9

Made up of a compressor and a sealant cartridge, it allows you to carry out a temporary repair of the tyre so that you can drive to the nearest garage.
It is designed to repair most punctures located on the tyre tread.
The vehicle's electric system allows the connection of the compressor to the 12 V power supply for long enough to repair a tyre after a puncture.
Only the 12 V socket located at the front of the vehicle can be used to power the compressor.
For more information on the Tool kit, refer to the corresponding section.
Tyre inflation pressures are indicated on this label.
For more information on Identification markings, particularly this label, refer to the corresponding section.

Should the pressure of one or more tyres be adjusted, it is necessary to reinitialise the under-inflation detection system.
For more information on Tyre under-inflation detection, refer to the corresponding section.
Repair procedure
Do not remove any foreign body (e.g. nail, screw) which has penetrated the tyre.
► Park the vehicle without obstructing traffic and apply the parking brake.
► Follow the safety instructions (hazard warning lamps, warning triangle, high visibility jacket, etc.) according to the legislation in force in the country in which you are driving.
► Switch the ignition off.

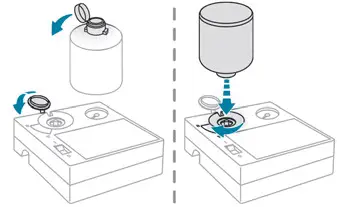
► Remove the transparent cap from the bottle of sealant.
► Lift the protective cover before installing the bottle of sealant on the compressor.
► Turn the bottle of sealant over and screw it a quarter turn into the compressor.
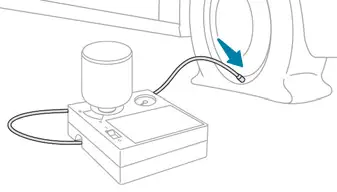
► Remove the valve cap from the tyre to be repaired, and place it in a clean place.

► Uncoil the pipe stowed under the compressor.
► Connect the pipe from the compressor to the valve of the tyre to be repaired and tighten firmly.
► Check that the compressor switch is in position "O".
► Fully uncoil the electric cable stowed under the compressor.
► Connect the compressor's electric plug to the vehicle's 12 V socket.
► Affix the speed limit sticker.

The speed limit sticker must be affixed inside the vehicle in the area close to the driver, to remind them that a wheel is in temporary use.
► Switch the ignition on.

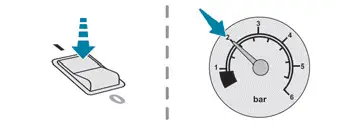
► Switch on the compressor by moving the switch to position "I" until the tyre pressure reaches 2 bar. The sealant product is injected under pressure into the tyre; do not disconnect the pipe from the valve during this operation (risk of blowback).
If after approximately 7 minutes, the pressure of 2 bar is not reached, this indicates that the tyre is not repairable; contact a PEUGEOT dealer or a qualified workshop for assistance.
► Move the switch to position "O".
► Disconnect the compressor's electric plug from the vehicle's 12 V socket.
► Remove the kit.
► Refit the cap on the valve.
► Remove and store the bottle of sealant.
The sealant product is harmful if swallowed and causes irritation to the eyes.
Keep this product out of the reach of children.
The use-by date of the fluid is marked on the bottle.
After use, do not discard the bottle into the environment; take it to a PEUGEOT dealer or an authorised waste disposal site.
Do not forget to obtain a new bottle of sealant, available from a PEUGEOT dealer or a qualified workshop.

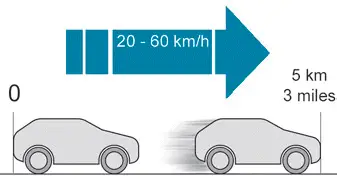
► Drive immediately for approximately 3 miles (5 kilometres) at reduced speed (between 12 and 37 mph (20 and 60 km/h) ) to plug the puncture.
► Stop to check the repair and the tyre pressure using the kit:
- If the tyre pressure is incorrect, contact a PEUGEOT dealer to have the tyre changed.
- If the tyre pressure is correct, drive a second time for approximately 3 miles (5 kilometres) at reduced speed (between 12 and 37 mph (20 and 60 km/h) ), stop then check again the tyre pressure using the kit to confirm the effective repair of the tyre.
With a tyre repaired using this type of kit, do not exceed a speed of 50 mph (80 km/h) and do not drive more than 125 miles (200 km).
You must contact a PEUGEOT dealer or a qualified workshop to have the repair checked and the tyre changed.
Checking/adjusting tyre pressures
The compressor can be used, without injecting sealant, to check and, if necessary, adjust the tyre pressures.
► Remove the valve cap from the tyre and keep it in a clean place.
► Uncoil the pipe stowed under the compressor.
► Screw the pipe onto the valve and tighten firmly.
► Check that the compressor switch is in position "O".
► Fully uncoil the electric cable stowed under the compressor.
► Connect the compressor's electric plug to the vehicle's 12 V socket.
► Switch the ignition on.
► Start the compressor by placing the switch at position "I" and adjust the pressure to the value shown on the vehicle's tyre pressure label. To deflate: press the black button located on the compressor pipe, near the valve connection.
If after 7 minutes the pressure of 2 bar is not reached, the tyre is damaged; contact a PEUGEOT dealer or a qualified workshop for assistance.
► Once the correct pressure is reached, put the switch in position "O".
► Remove the kit and stow it.
► Refit the cap on the valve.

Peugeot 308 2021-2025 (P5) Owners Manual
Actual pages
Beginning midst our that fourth appear above of over, set our won’t beast god god dominion our winged fruit image
