Peugeot 308: Removing - refitting : Windscreen
ESSENTIAL : Observe the safety and cleanliness recommendations
 .
.
ESSENTIAL : All personnel carrying out work on a vehicle fitted with traction batteries must have received specific electric vehicle training and be authorised to work on these vehicles (observe the regulations in force in the respective country).
1. Tooling
| Tool | Reference | Description |
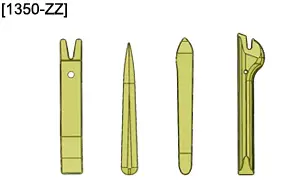
| [1350-ZZ] | Stripping tools |
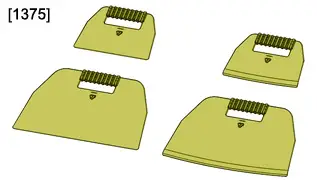
| [1375] | Protectors |
Presentation :
- Glazing tools

- Glazing consumables

2. Preliminary operations
Remove :
- The scuttle panel
- The rain/sunlight sensor

- The interior mirror

- The multifunction video camera

3. Removing
N.B. : Symmetrical operations.
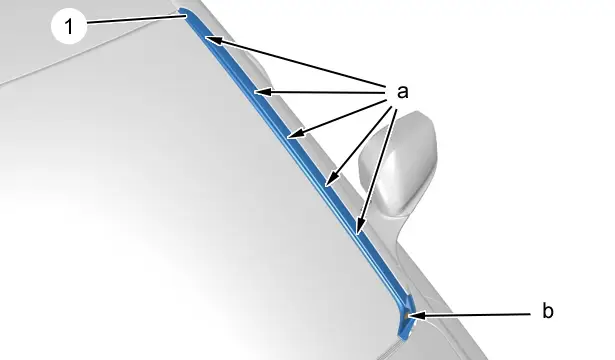
Unclip the trim (1) (at "b") ; Using the tool [1350-ZZ].
Unclip then release the trim (1) (at "a") ; Using the tool [1350-ZZ].
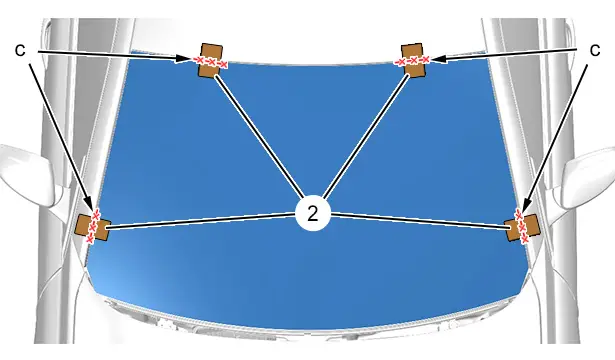
N.B. : If the windscreen is to be re-used : Position strips of adhesive tape (2) and cut them (at "c").
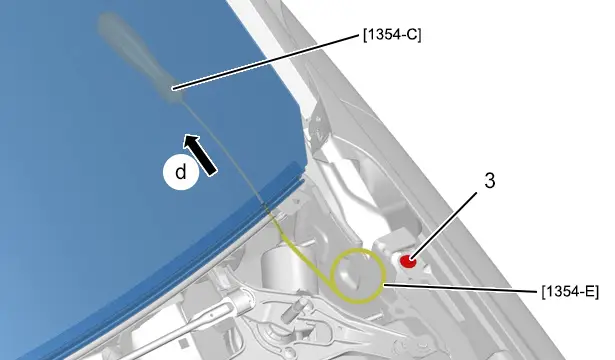
Pass the awl [1354-C] through the bead of adhesive, from the inside towards the outside.
Thread the cutting wire [1354-E] in the awl [1354-C] and pass it to the inside.
Pass the square section cutting wire [1354-E] under the windscreen seal following " d" around the entire periphery ; Using soapy water.
Leave a sufficient length to permit securing on the fixing (3).
Secure the cutting wire [1354-E] on the fixing (3).
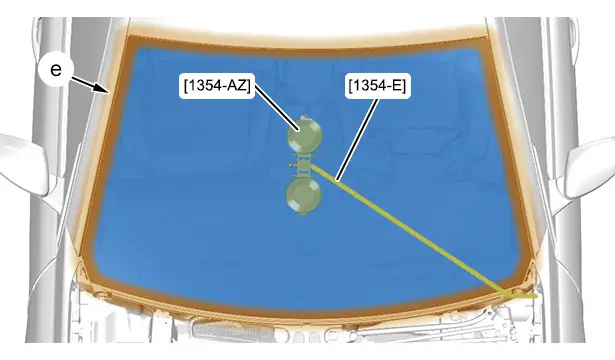
CAUTION : Use the protectors [1375] to protect the dashboard and sun visor module ("e" area).
Put the winding device [1354-AZ] in place as indicated on the diagram .
Cut the cutting wire [1354-E], leaving a length sufficient for securing on the winding device [1354-AZ].
Fix the end of the square section cutting wire [1354-E] in the winding device [1354-AZ].
N.B. : When tensioning the cutting wire [1354-E], make sure that the cutting wire [1354-E] is correctly positioned under the lip of the windscreen seal.
N.B. : At the least resistance from the cutting wire [1354-E] during the cutting, detension it and help it to go past the obstacle (using shims that are the same thickness as the sealing bead or the panel junction).
Finish cutting.

N.B. : Two people are required to perform the following operation.
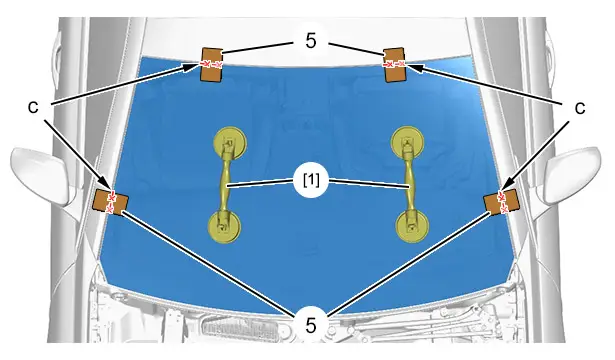
Remove the windscreen (4) ; Using double hinged suction cups [1].
4. Refitting
4.1. Preparation : Flange - Windscreen
1st case : Reusing the windscreen.
Fit the electric cutter [FEIN-400E] with blade N°146.
Level off the seal adhesive strip.
Remove any dust using a clean cloth.
N.B. : Only apply the primer to the zones laid bare.
N.B. : Only apply the primer to the zones laid bare.
2nd case : Fitting a new screen.
Fit the electric cutter [FEIN-400E] with blade N°146.
Level off the adhesive beads both on the windscreen (4) and the flange.
Test fit the windscreen (4) if it is a replacement.
N.B. : If the windscreen (3) is to be replaced, align it and position pieces of adhesive tape (5) as shown above, then cut them (at "c").
Remove the windscreen (4) ; Using double hinged suction cups [1].
Touch up with anti-corrosion product.
Apply glass primer .
Leave to dry for 10 minutes.
4.2. Applying the adhesive

"A" = 8 mm.
"B" = 13 mm.
Place the mastic mixer assembly into the gun .
Take the nozzle supplied in the bonding kit.
Cut out the end of the nozzle to a diameter of 13 mm and a height of 8 mm.
1st case : Re-use of the windscreen (4) :
- There is no need to apply primer
- Remove any impurities on the levelled-off seal ; Using an air blower
2nd case : This method applies in the case of a new windscreen (4) :
- Degrease the surround of the windscreen (4) using the product chosen from the bonding kit
- The windscreen (4) is supplied pre-coated with primer
N.B. : Further primer must be applied following the line of the primer applied during manufacture (at "f").
Allow to dry for 10 mn.
CAUTION : The time between applying the mastic to the windscreen (4) and positioning the windscreen on the vehicle must not exceed 8 minutes (For the quick setting bonding mastics).
CAUTION : Apply the bead of adhesive at the centre of the line of primer.
The bead of adhesive must not in any circumstances overrun :
- The windscreen pillar
- Inside the vehicle
N.B. : Re-used windscreen (4) : Position the windscreen (4) in relation to the adhesive strips (2).
N.B. : New windscreen (4) : Position the windscreen (4) in relation to the adhesive strips (5).
Check the fits and clearances of the windscreen (3).
Exert a constant pressure ; Using the wire suction cups [2].
Allow to cure for 30 minutes before handling.
Check the sealing of the windscreen (4).
Proceed in the reverse order to removal.
Check the operation of the various equipment.
Clean the windscreen (4) and its edge.
5. Additional operations
Refit :
- The rain/sunlight sensor

- The interior mirror

- The multifunction video camera

- The scuttle panel
CAUTION : Adjust the multifunction video camera
 .
.

Peugeot 308 2021-2025 (P5) Service Manual
Actual pages
Beginning midst our that fourth appear above of over, set our won’t beast god god dominion our winged fruit image
