Peugeot 308: Charging the traction battery (Rechargeable hybrid)
Principle
For more information, refer to the General recommendations on electrified vehicles and the Specific recommendations on rechargeable hybrid or electric vehicles.
For a full charge, follow the charging procedure without interrupting it, until it stops automatically.
Charging may be performed either immediately (by default) or deferred.
 Deferred charging is set via
the touch
screen or the MYPEUGEOT APP
application.
When the vehicle is connected, the following information is displayed on the instrument panel:
- Traction battery charge status (%).
- Remaining range (miles or km).
- Estimated charging time (calculation may take a few seconds).
- Charging speed (miles or km gained per hour).
After the instrument panel has been put into standby mode, this information can be displayed again by unlocking the vehicle or opening a door.
It is also possible to monitor the charging progress using the MYPEUGEOT APP application.
For more information on Remotely operable additional functions, refer to the corresponding section.
Lounge mode
When the vehicle is connected, it is possible to switch on the ignition and use certain functions such as the audio and telematics system and the air conditioning system for several hours.
Low charging / Driving
Driving when the charge level of the traction battery is too low can lead to the vehicle breaking down and can lead to accidents or serious injuries. ALWAYS make sure the traction battery has a sufficient charge level.
Low charging / Parking
If the outside temperature is negative, it is recommended not to park your vehicle outside for several hours at a low charging (less than 20%).
Vehicle in storage for more than 1 month
In the event of a long period of non-use of the vehicle (beyond 4 weeks) without the possibility of charging when restarting, the self-discharge may make it impossible to restart if the traction battery charge level is a low or very low, especially at negative ambient temperatures. ALWAYS make sure that the traction battery has a charge between 20% and 40% if you do not plan to use your vehicle for several weeks.
Do not connect the charging cable.
Always park the vehicle in a place with temperatures between -10ºC and 30ºC (parking in a place with extreme temperatures can damage the traction battery).
Refer to the 12 V battery/Accessory batteries section for the battery disconnection procedure.
Precautions
Before charging
Depending on the context:
► Have a professional check that the electrical system to be used complies with applicable standards and is compatible with the vehicle.
► Have a professional electrician install a dedicated domestic power socket or accelerated charging unit (Wallbox) compatible with the vehicle.
Use the charging cable supplied with the vehicle.
For more information, contact a PEUGEOT dealer or a qualified workshop.
During charging
As a safety measure, the engine will not start if the charging cable is plugged into the connector on the vehicle. A warning is displayed on the instrument panel.
While charging is in progress, unlocking the vehicle will cause the charging to stop.
If no action is taken on one of the openings (door or boot) or on the charging nozzle, the vehicle will lock again after 30 seconds and charging will resume automatically.
Never work under the bonnet:
- Some areas remain very hot, even an hour after charging ends - risk of burns! - The fan may start at any time - risk of cuts or strangulation!
After charging
Check that the charging flap is closed.
Do not leave the cable connected to the domestic power socket - risk of short-circuit or electrocution in the event of contact with or immersion in water!
Deferred charging
By default, the deferred charging start time is set to be around midnight.
Depending on equipment, this time can be changed.
Settings
 ► In the Energy touch screen
application, select the Charging tab.
► Set the charging start time.
► Press OK.
The setting is saved in the system.
 You can also programme the
deferred
charging function using a smartphone, via
the MYPEUGEOT APP application.
For more information on Remotely operable additional functions, refer to the corresponding section.
Activation
► After programming the deferred charging, connect the vehicle to the desired charging equipment.
 ► Press this button in the flap
within one
minute to activate the deferred charging
(confirmed by the light guides coming on in
blue).
Charging procedure
Connection
► Before charging, check that the gear selector is in mode P and the ignition is off, otherwise charging is impossible.
► Press on the rear of the charging flap to open it and check that there are no foreign bodies on the vehicle's charging connector.
The light guides in the flap come on white.
Domestic charging (mode 2)


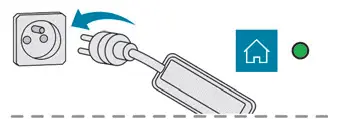
► First, connect the charging cable from the control unit to the domestic socket.
When the connection is made, all of the indicator lamps on the control unit light up, then only the POWER indicator lamp remains on in green.
► Remove the protective cover from the charging nozzle.
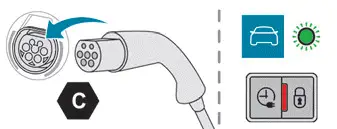
► Insert the nozzle into the vehicle's charging connector.
The start of charging is confirmed by the flashing of the green light guides in the flap and the flashing of the CHARGE indicator lamp in green on the control unit.
If this is not the case, charging has not started; restart the procedure, ensuring that all of the connections are properly established.
The red indicator lamp in the flap comes on to indicate that the nozzle is locked.
Accelerated charging (mode 3)

► Follow the accelerated charging unit (Wallbox) user instructions.
► Remove the protective cover from the charging nozzle.
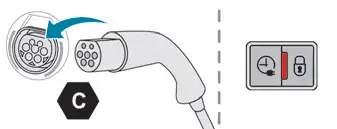
► Insert the nozzle into the vehicle's charging connector.
The start of charging is confirmed by the flashing of the green light guides in the flap.
If this is not the case, charging has not started; restart the procedure ensuring that all connections are properly established.
The red indicator lamp in the flap comes on to indicate that the nozzle is locked.
Disconnection

Before disconnecting the nozzle from the charging connector:
► If the vehicle is locked, unlock it.
► If the vehicle is unlocked, lock it and then unlock it.
If selective unlocking of the doors is activated, press the unlocking button on the remote control twice to disconnect the nozzle.
The red indicator lamp in the flap goes out to confirm that the nozzle is unlocked.
► Within 30 seconds, remove the charging nozzle.
Domestic charging (mode 2)
The end of charging is confirmed when the green CHARGE indicator lamp on the control unit comes on fixed and the green light guides in the flap come on fixed.
► After disconnection, replace the protective cover over the nozzle and close the charging flap.
► Disconnect the control unit's charging cable from the domestic socket.
Accelerated charging (mode 3)
The end of charging is confirmed by the accelerated charging unit (Wallbox) and when the green light guides in the flap come on fixed.
► After disconnection, replace the nozzle on to the charging unit and close the charging flap.

Peugeot 308 2021-2025 (P5) Owners Manual
Charging the traction battery (Rechargeable hybrid)
Actual pages
Beginning midst our that fourth appear above of over, set our won’t beast god god dominion our winged fruit image
