Peugeot 308: Dismantling : manual gearbox
ESSENTIAL : Observe the safety and cleanliness recommendations
 .
.
1. Tooling
Presentation of the equipment
 .
.
2. Removing
2.1. gearbox casing
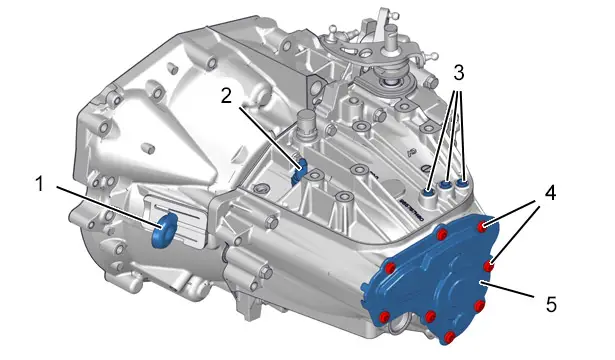
Remove :
- The release fork (1)
- The clutch bearing
- The clutch stop guide
- The reverse gear switch (2)
- The 3 locking caps (3) (save the springs and the balls)
- The bolts (4)
- The steel casing (5) (not to be re-used)
N.B. : Depending on version, the declutch fork ( 1) is mounted either on the ball-joint or on the shaft ; In the second case : Use tool [0332-R].
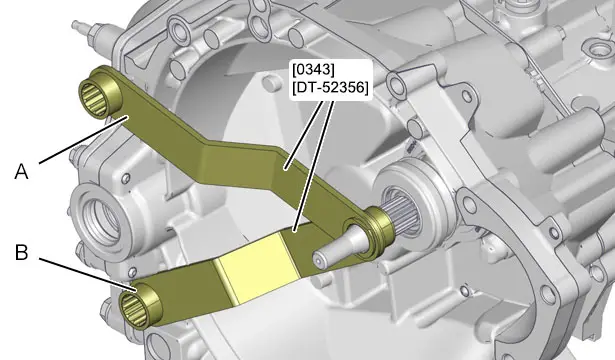
"A" Output shaft lock ring.
"B" Input shaft lock ring.
Fit tool [0343] / [DT-52356] on the input shaft (Position "A" ).
Engage a gear.
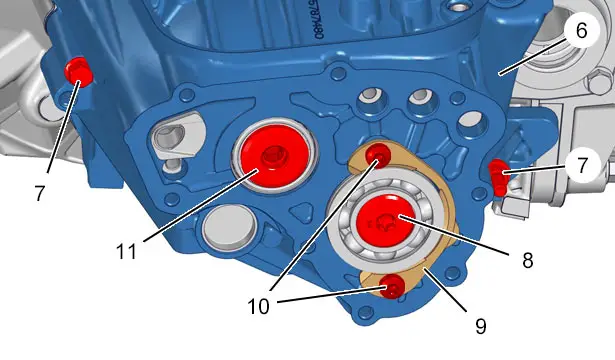
Remove the secondary shaft screw ( 8).
Fit tool [0343] / [DT-52356] on the input shaft (Position "B" ).
Remove the primary shaft screw ( 11) ; Using the tool [0332-U].
Set the gearbox in neutral.
Remove :
- The tool [0343] / [DT-52356]
- The bolts (10)
- Bearing stop ring ( 9)
- The bolts (7)
- The gearbox casing (6)
N.B. : Detach the gearbox casing, using a non-cutting lever in the locations provided.
CAUTION : Recover the magnetic disc.
2.2. Input and secondary shafts
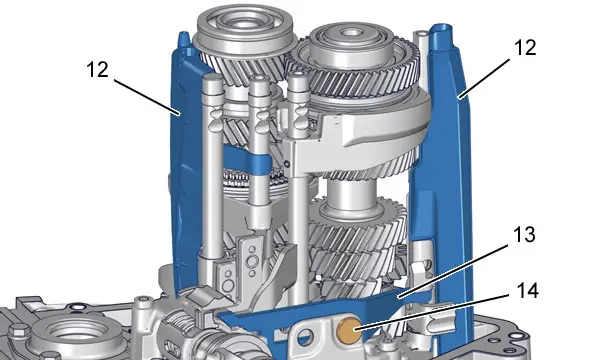
Remove :
- The lubrication spouts (12)
- The reverse gear rocker lever shaft ( 14)
- The reverse gear sliding gear ( 13)
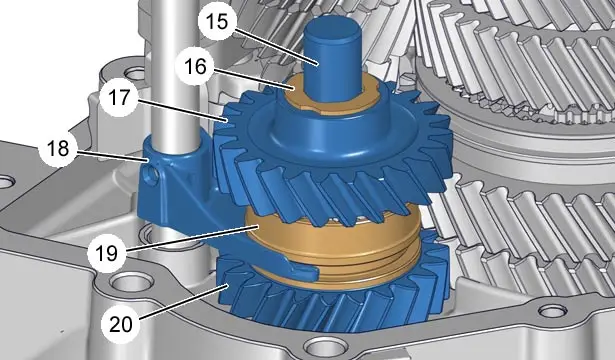
Remove :
- The reverse gear shaft ( 15)
- The thrust washer (16)
- The reverse gear intermediate pinion ( 17) and its needle cage (mark to distinguish the elements of the reverse gear synchronizer)
- The reverse gear fork (18) and the synchronizer sleeve (19)
- The reverse gear return pinion ( 20) and its needle cage
- The thrust stop under the reverse idling gear
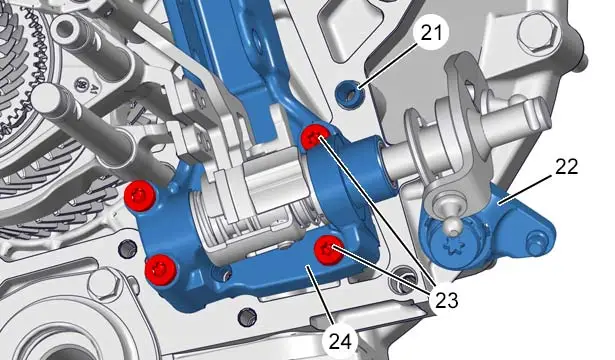
Remove :
- The casing centring pin (21)
- The external lever and its shaft (22)
- The bolts (23)
Engage 2nd, 4th and 6th gears.
Lift the gear control plate ( 24) and disengage the centring pins.
Remove the gear control plate ( 24).

Remove the assembly of the following components :
- The input shaft (26)
- The secondary shaft (25)
- The shaft and the fork (29) (1st and 2nd gears)
- The shaft and the fork (28) (third and fourth gear)
- The shaft and the fork (27) (fifth and sixth gear)
2.3. Differential housing
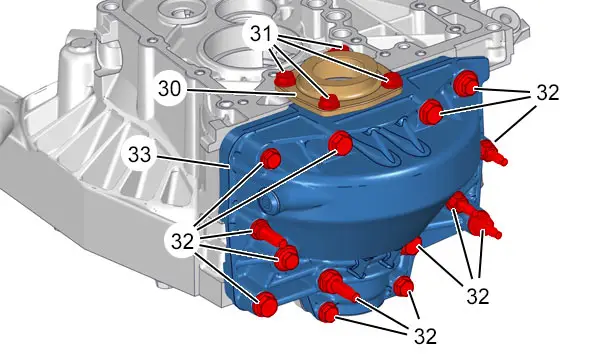
Remove :
- The bolts (31)
- The bearing thrust plate ( 30)
- The bolts (32)
- Differential housing half ( 33)
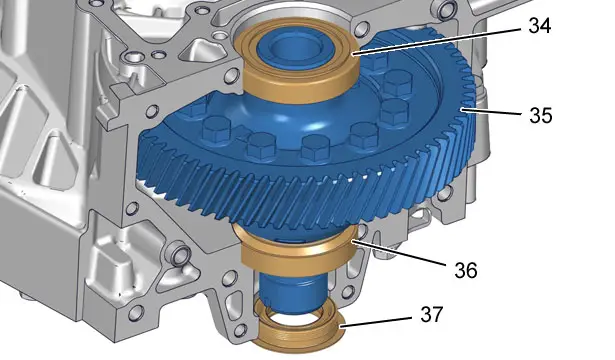
Remove :
- The gearbox output seal ( 37) (speedometer drive end)
- The differential (35)
- The external bushes of the (34) and (36) bearings
3. Gearbox control plate
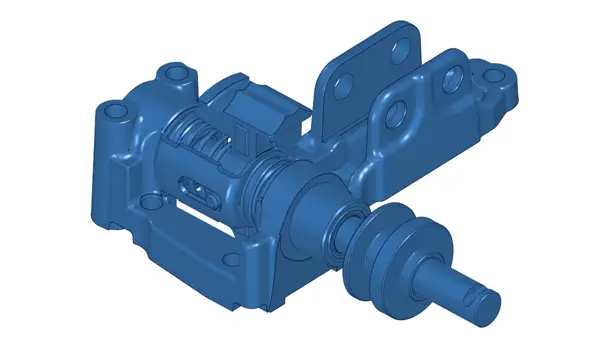
Gearbox control plate .
3.1. Description

(38) Plate .
(39) Centralising pin.
(40) Bearing .
(41) Pin .
(42) seal.
(43) Gear engagement shaft.
(44) Gear engagement eye.
(45) spring .
(46) bolts .
3.2. Stripping

Remove :
- The pin (41)
- The bolt (46)
- The gear selection shaft ( 43)
- The gear engagement eye ( 44) (retain the spring)
- The centring pin (39)
- The plate (38)
- The bearings (40)
- The spring (45)

Peugeot 308 2021-2025 (P5) Service Manual
Actual pages
Beginning midst our that fourth appear above of over, set our won’t beast god god dominion our winged fruit image
