Peugeot 308: Removing - refitting : Air conditioning duct
ESSENTIAL : Observe the safety and cleanliness recommendations
 .
.
ESSENTIAL : All personnel carrying out work on a vehicle fitted with traction batteries must have received specific electric vehicle training and be authorised to work on these vehicles (observe the regulations in force in the respective country).
ESSENTIAL : Follow the recommended precautions before carrying out any work on the air conditioning circuit.
CAUTION : Only remove the plugs from the air conditioning ducts, clamps and unions at the moment when these are connected on the vehicle.
1. Replacement of parts in all cases
| Description | Quantity |
| O-ring seal (Air conditioning ducts) | 38 |
2. Tooling
Workshop equipment : Air conditioning circuit filling and recycling station.
| Tool | Reference | Description |
| [1701-HZ] (*) | Set of plugs |
| (*) Use standard workshop equipment if the special tool is not available | ||

3. Preliminary operations
CAUTION : Perform the operations that are required before disconnecting the ancillaries batteries
 .
.
Disconnect the ancillaries batteries
 (Following the specific procedure).
Drain the air conditioning circuit ; Using the air conditioning circuit filling and recycling station.
Remove (depending on equipment) :
- The electric drive machine cover
- The under-engine protector
- The front bumper
- The deflector under the front bumper
- The right-hand front headlamp
CAUTION : Do not open the electric drive train cooling circuit.
Move aside the expansion chamber (Without opening the cooling system ).
4. Removing
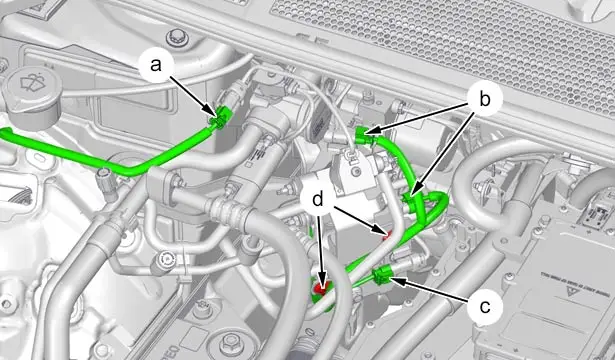
Disconnect the connectors (at "a", "b", "c").
Unclip the electrical harness (at "d").
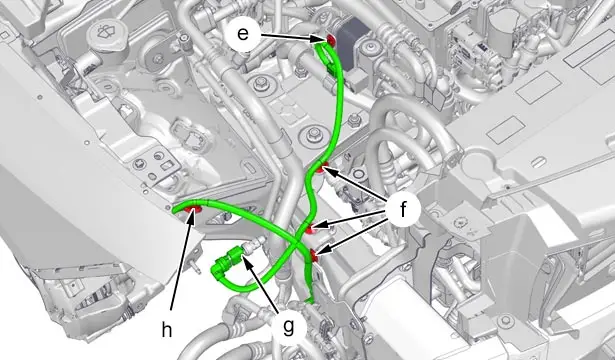
Unclip the electrical harness (at "e","f","h").
Disconnect the connectors(at "g").
CAUTION : Plug all of the ducts quickly to prevent the entry of moisture ; Using the tool [1701-HZ].
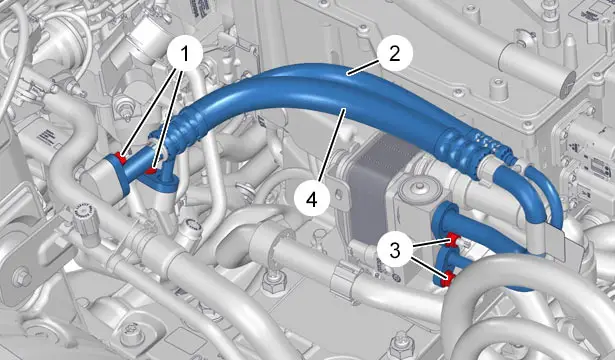
Remove :
- The nuts (1) and (3)
- The high pressure air conditioning pipe (2) (Air conditioning duct / Coolant - air conditioning heat exchanger )
- The low pressure air conditioning duct (4) (Air conditioning duct / Coolant - air conditioning heat exchanger )
CAUTION : Plug all of the ducts quickly to prevent the entry of moisture ; Using the tool [1701-HZ].
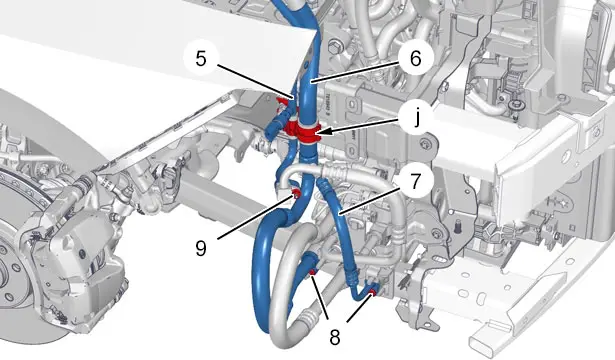
Unclip the air conditioning ducts (5),(6)(at "j").
Remove the nuts (8),(9).
Release :
- The high pressure air conditioning pipe (5) (Air conditioning duct / Controlled pressure relief valve )
- The low pressure air conditioning duct (6),(7) (Air conditioning duct / Controlled pressure relief valve )

CAUTION : Plug all of the ducts quickly to prevent the entry of moisture ; Using the tool [1701-HZ].
Remove the nuts (10).
Release :
- The low pressure air conditioning duct (6) (Controlled pressure relief valve / Heating unit )
- The high pressure air conditioning pipe (11) (Controlled pressure relief valve / Heating unit )
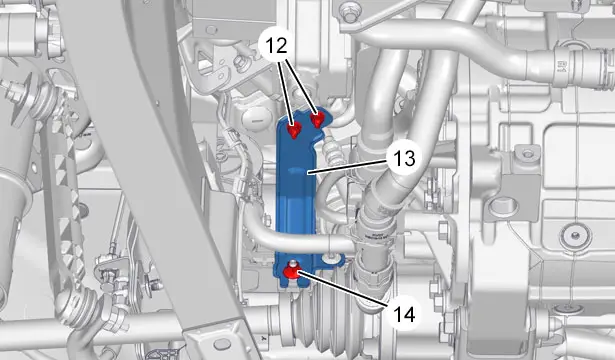
Remove(from below) :
- The nuts (12),(14)
- The plate (13)
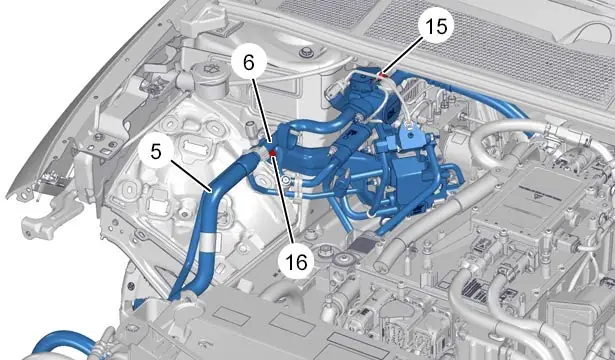
Remove :
- Nut (15)
- The bolt (16)
- The air conditioning pipes assembly (5),(6)

CAUTION : Plug all of the ducts quickly to prevent the entry of moisture ; Using the tool [1701-HZ].
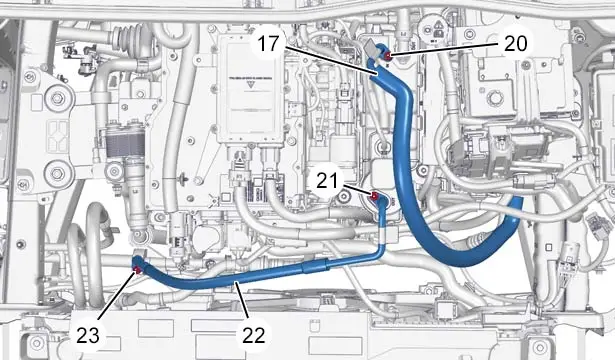
Unclip the air conditioning ducts (17), (19)(at "k").
Remove the nuts (18).
Uncouple :
- The high pressure air conditioning pipe (17) (Electric air conditioning compressor / Water condenser )
- The low pressure air conditioning duct (19) (Electric air conditioning compressor / Air conditioning duct )
CAUTION : Plug all of the ducts quickly to prevent the entry of moisture ; Using the tool [1701-HZ].
Remove :
- The nuts (20),(21),(23)
- The high pressure air conditioning pipe (17) (Electric air conditioning compressor / Water condenser )
- The high pressure air conditioning pipe (22) (Water condenser / Air conditioning duct )
CAUTION : Plug all of the ducts quickly to prevent the entry of moisture ; Using the tool [1701-HZ].
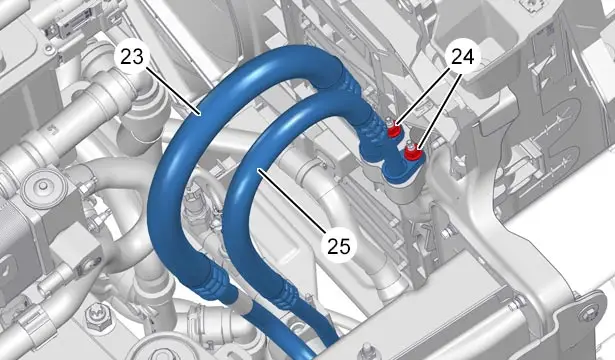
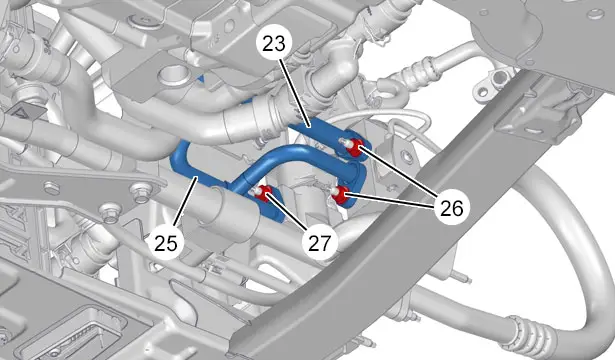
Remove the nuts (24).
Release :
- The high pressure air conditioning pipe (25) (Engine compartment air conditioning evaporator / valve)
- The low pressure air conditioning duct (23) (Engine compartment air conditioning evaporator / Pressure relief valve )
CAUTION : Plug all of the ducts quickly to prevent the entry of moisture ; Using the tool [1701-HZ].
Remove :
- The nuts (26) and (27)
- The high pressure air conditioning pipe (25) (Engine compartment air conditioning evaporator / valve)
- The low pressure air conditioning duct (23) (Engine compartment air conditioning evaporator / valve)
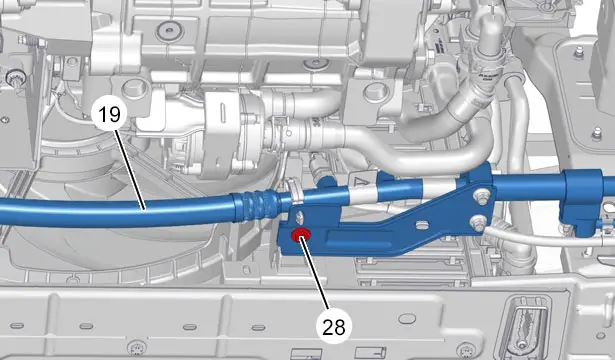
Remove the bolt (28).
CAUTION : Plug all of the ducts quickly to prevent the entry of moisture ; Using the tool [1701-HZ].
Move aside the low-pressure air conditioning duct (19) (Electric air conditioning compressor / Air conditioning duct ).
CAUTION : Plug all of the ducts quickly to prevent the entry of moisture ; Using the tool [1701-HZ].
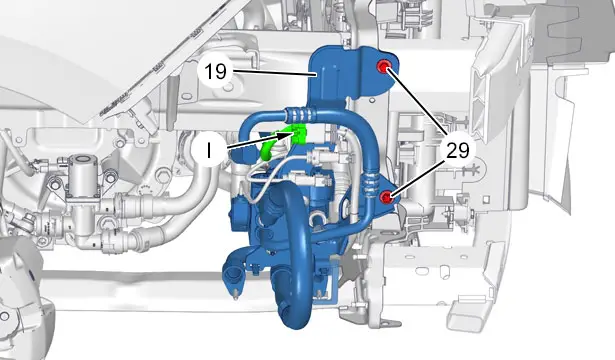
Disconnect the connector (at "l").
Remove :
- The 2 bolts (29)
- The low pressure air conditioning duct (19) (Electric air conditioning compressor / Air conditioning duct )
5. Refitting
CAUTION : Observe the tightening torques
 .
.
CAUTION : Check that the air conditioning pipes are clean upstream and downstream of the air conditioning circuit components.
N.B. : Fit new O-ring seals lubricated with air conditioning compressor oil before refitting the air conditioning ducts.
CAUTION : Each of the flanges of the air conditioning pipes (5), (6) and (17), (19),(22),(23),(25) must be in contact with its interface before the nuts are tightened.
Refit :
- The low pressure air conditioning duct (19) (Electric air conditioning compressor / Air conditioning duct )
- The 2 bolts (29)
- The bolt (28)
Reconnect the connector (at "l").
Refit :
- The high pressure air conditioning pipe (25) (Engine compartment air conditioning evaporator / valve)
- The low pressure air conditioning duct (23) (Engine compartment air conditioning evaporator / valve)
- The high pressure air conditioning pipe (25) (Engine compartment air conditioning evaporator / valve)
- The low pressure air conditioning duct (23) (Engine compartment air conditioning evaporator / Pressure relief valve )
- The nuts (26) and (27)
- The nuts (24)
Refit :
- The high pressure air conditioning pipe (17) (Electric air conditioning compressor / Water condenser )
- The high pressure air conditioning pipe (22) (Water condenser / Air conditioning duct )
- The nuts (20),(21),(23)
Couple up :
- The high pressure air conditioning pipe (17) (Electric air conditioning compressor / Water condenser )
- The low pressure air conditioning duct (19) (Electric air conditioning compressor / Air conditioning duct )
Refit the nuts (18).
Clip the air conditioning pipes (17), (19)(at "k").
Refit :
- The air conditioning pipes assembly (5),(6)
- Nut (15)
- The bolt (16)
- The plate (13)
- The nuts (12),(14)
Refit :
- The low pressure air conditioning duct (6) (Controlled pressure relief valve / Heating unit )
- The high pressure air conditioning pipe (11) (Controlled pressure relief valve / Heating unit )
- Refit the nuts (10)
Refit :
- The high pressure air conditioning pipe (5) (Air conditioning duct / Controlled pressure relief valve )
- The low pressure air conditioning duct (6),(7) (Air conditioning duct / Controlled pressure relief valve )
- The nuts (8),(9)
Clip the air conditioning pipes (5),(6)(at "j").
Refit :
- The high pressure air conditioning pipe (2) (Air conditioning duct / Coolant - air conditioning heat exchanger )
- The low pressure air conditioning duct (4) (Air conditioning duct / Coolant - air conditioning heat exchanger )
- The nuts (1) and (3)
Clip :
- The electrical harness (at "e","f","h")
- The electrical harness (at "d")
Reconnect :
- The connectors (at "g")
- The connectors (at "a", "b", "c")
6. Complementary operations
Carry out a vacuum extraction of the air conditioning circuit (For a minimum of 35 minutes) ; Using the air conditioning circuit filling and recycling station.
Check the sealing of the air conditioning circuit.
ELECTRIC DRIVE TRAIN
Fill the air conditioning circuit
 .
.
Refit :
- The right-hand front headlamp
- The front bumper
- The front bumper deflector
- The under-body protection
- The expansion bottle
- The electric drive machine cover
CAUTION : Perform the operations that are required after reconnecting the ancillaries batteries
 .
.
Reconnect the ancillaries batteries
 (Following the specific procedure).
CAUTION : After each operation on the air conditioning circuit, clean the air conditioning circuit.
To clean the air conditioning circuit ; Using the diagnostic tool :
- Connect the diagnostic tool
- Access the sub-menu : Electric drive train supervisor ECU / Repair / Service action / Cleaning of the air conditioning circuit
- Activate the air conditioning circuit cleaning procedure
Check the operation of the air conditioning.

Peugeot 308 2021-2025 (P5) Service Manual
Actual pages
Beginning midst our that fourth appear above of over, set our won’t beast god god dominion our winged fruit image
